Oltre ad aver configurato il mio progetto iOs per la ricezione di push notification da FCM (Google Firebase), ho configurato anche il mio progetto Android.
Ecco di seguito cosa ho dovuto fare.
Fase 1: Configurazione grandle
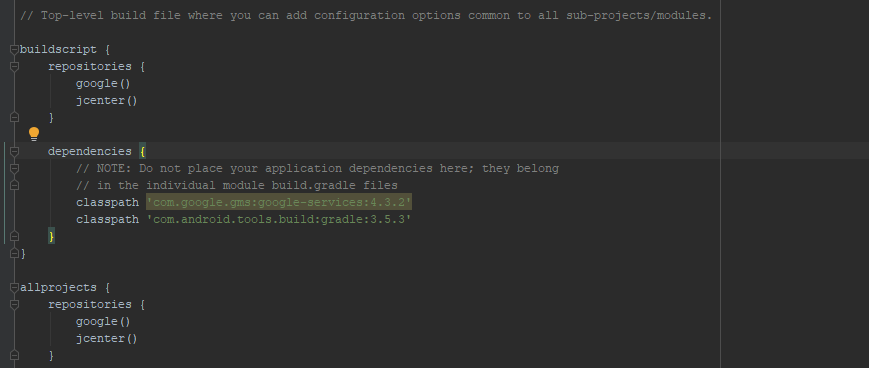
Il primo file sul quale intervenire è build.grandle, che si trova nella cartella principale dell’applicazione. Qui vanno aggiunte le due dipendenze evidenziate nello screen-shot (attenzione alle versioni, potrebbero essercene di più recenti quando leggi questo articolo!).
Il secondo file è build.grandle nella cartellina di modulo, e vanno inserite le seguenti dipendenze:
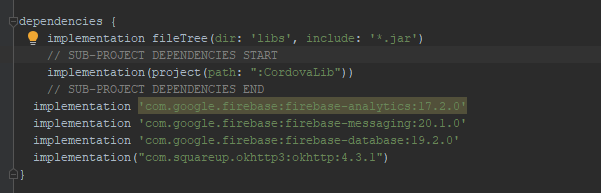
Occhio che per inviare, come nel mio caso, il device token ad un server, occorre anche la libreria okhttp.
Fase 2: Configurazione accesso ad internet
Nel file AndroidManifest.xml va aggiunta la seguente proprietà:
<uses-permission android:name="android.permission.INTERNET" />Fase 3: Implementazione ricezione token
L’implementazione è abbastanza semplice, basta agire sul solo file MainActivity.java, nel metodo onCreate, ed inserire il seguente snippet:
FirebaseInstanceId.getInstance().getInstanceId().addOnSuccessListener(new OnSuccessListener<InstanceIdResult>() {
        @Override
        public void onSuccess(InstanceIdResult instanceIdResult) {
          String token = instanceIdResult.getToken();
          new Thread(new Runnable(){
            @Override
            public void run() {
              try {
                MediaType MEDIA_TYPE_MARKDOWN = MediaType.parse("text/x-markdown; charset=utf-8");

                try {
                  OkHttpClient.Builder builder = new OkHttpClient.Builder();
                  builder.connectTimeout(5, TimeUnit.MINUTES) // connect timeout
                    .writeTimeout(5, TimeUnit.MINUTES) // write timeout
                    .readTimeout(5, TimeUnit.MINUTES); // read timeout

                  final TrustManager[] trustAllCerts = new TrustManager[] {
                    new X509TrustManager() {
                      @Override
                      public void checkClientTrusted(java.security.cert.X509Certificate[] chain, String authType) throws CertificateException {
                      }

                      @Override
                      public void checkServerTrusted(java.security.cert.X509Certificate[] chain, String authType) throws CertificateException {
                      }

                      @Override
                      public java.security.cert.X509Certificate[] getAcceptedIssuers() {
                        return new java.security.cert.X509Certificate[0];
                      }
                    }
                  };

                  final SSLContext sslContext = SSLContext.getInstance("SSL");
                  sslContext.init(null, trustAllCerts, new java.security.SecureRandom());

                  builder.sslSocketFactory(sslContext.getSocketFactory());

                  OkHttpClient client = builder.build();

                  String postBody = "{\"utente\":\"pippo\", \"token\": \"" + token + "\"}";

                  Request request = new Request.Builder()
                    .header("Authorization", "my-auth-token")
                    .header("ContentType", "application/json")
                    .url("http://156.22.56.234:80/WebApp/salvaToken")
                    .post(RequestBody.create(MEDIA_TYPE_MARKDOWN, postBody))
                    .build();

                  try (Response response = client.newCall(request).execute()) {
                    if (!response.isSuccessful())
                      throw new IOException("Unexpected code " + response);

                    System.out.println(response.body().string());
                  }
                }catch (Exception ex) {
                  System.out.println(ex.getMessage());
                }
              }
              catch (Exception ex) {
                ex.printStackTrace();
              }
            }
          }).start();
Fase 4: implementare la classe di ricezione della notifica
Qua, occorre creare una classe che estenda FirebaseMessagingService, che “catturi” la push notification arrivata, e la mostri a video. Ecco qui del codice di esempio:
public class MyFirebaseMessagingService extends FirebaseMessagingService {

    @Override
    public void onMessageReceived(RemoteMessage remoteMessage) {
        if (remoteMessage.getNotification().getBody() != null) {
            Log.e("FIREBASE", "Message Notification Body: " + remoteMessage.getNotification().getBody());
            sendNotification(remoteMessage);
        }
    }

    private void sendNotification(RemoteMessage remoteMessage) {
      Bitmap icon = BitmapFactory.decodeResource(getResources(), R.mipmap.ic_launcher);

      Intent intent = new Intent(this, MainActivity.class);
      intent.addFlags(Intent.FLAG_ACTIVITY_CLEAR_TOP);
      PendingIntent pendingIntent = PendingIntent.getActivity(this, 0, intent, PendingIntent.FLAG_ONE_SHOT);

      String GROUP_KEY_WORK_EMAIL = "it.mydom.myapp.WORK_EMAIL";

      NotificationCompat.Builder notificationBuilder = new NotificationCompat.Builder(this, "channel_id")
        .setContentTitle(remoteMessage.getNotification().getTitle())
        .setContentText(remoteMessage.getNotification().getBody())
        .setAutoCancel(true)
        .setSound(RingtoneManager.getDefaultUri(RingtoneManager.TYPE_NOTIFICATION))
        .setContentIntent(pendingIntent)
        .setContentInfo(remoteMessage.getNotification().getTitle())
        .setLargeIcon(icon)
        .setColor(Color.RED)
        .setLights(Color.RED, 1000, 300)
        .setDefaults(Notification.DEFAULT_VIBRATE)
        .setSmallIcon(R.mipmap.ic_launcher)
        .setPriority(NotificationCompat.PRIORITY_MAX)
        .setVisibility(NotificationCompat.VISIBILITY_PUBLIC)
        .setGroup(GROUP_KEY_WORK_EMAIL); // questo è per i dispositivi wearable
      // .setGroupSummary(true);

      try {
        String picture_url = remoteMessage.getData().get("picture_url");
        if (picture_url != null && !"".equals(picture_url)) {
          URL url = new URL(picture_url);
          Bitmap bigPicture = BitmapFactory.decodeStream(url.openConnection().getInputStream());
          notificationBuilder.setStyle(
            new NotificationCompat.BigPictureStyle().bigPicture(bigPicture).setSummaryText(remoteMessage.getNotification().getBody())
          );
        }
      } catch (IOException e) {
        e.printStackTrace();
      }

      NotificationManager notificationManager = (NotificationManager) getSystemService(Context.NOTIFICATION_SERVICE);

      // Notification Channel is required for Android O and above
      if (Build.VERSION.SDK_INT >= Build.VERSION_CODES.O) {
        NotificationChannel channel = new NotificationChannel(
          "channel_id", "channel_name", NotificationManager.IMPORTANCE_DEFAULT
        );
        channel.setDescription("channel description");
        channel.setShowBadge(true);
        channel.canShowBadge();
        channel.enableLights(true);
        channel.setLightColor(Color.RED);
        channel.enableVibration(true);
        channel.setVibrationPattern(new long[]{100, 200, 300, 400, 500});
        notificationManager.createNotificationChannel(channel);
      }

      notificationManager.notify(0, notificationBuilder.build());
    }


}
Grazie Eleonora, questa tua condivisione mi ha aiutato a capire alcuni passaggi che non riuscivo a comprendere.
Perfetto, ora ho ben compreso dopo una settimana di video “Hindi” inutili e confusi, come aprire una nuova activity al tap sulla notifica.
Grazie
Grazie a te per aver lasciato un commento, Gianni, buon lavoro!
Spero in aggiornamenti futuri sul tutorial, per implementare l’apertura di una SecondaActivity anche con app in background.
Grazie
Non so se ti può essere utile, ma quando l’app è in background, quando fai tap su una push notification l’app viene risvegliata e si può intercettare l’azione nella classe MainActivity con l’override della funzione onNewIntent(Intent iiii).